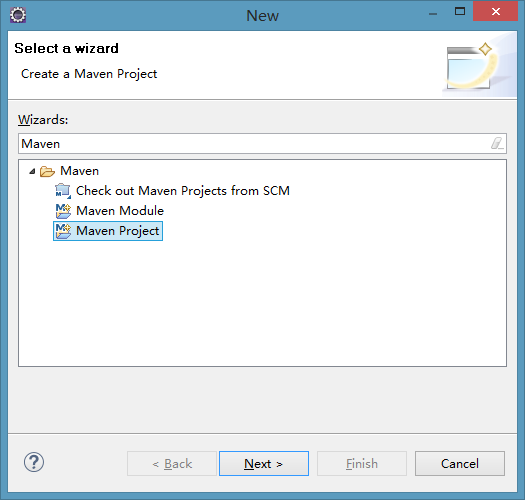
Eclipse中Maven项目创建
Eclipse中Maven项目创建
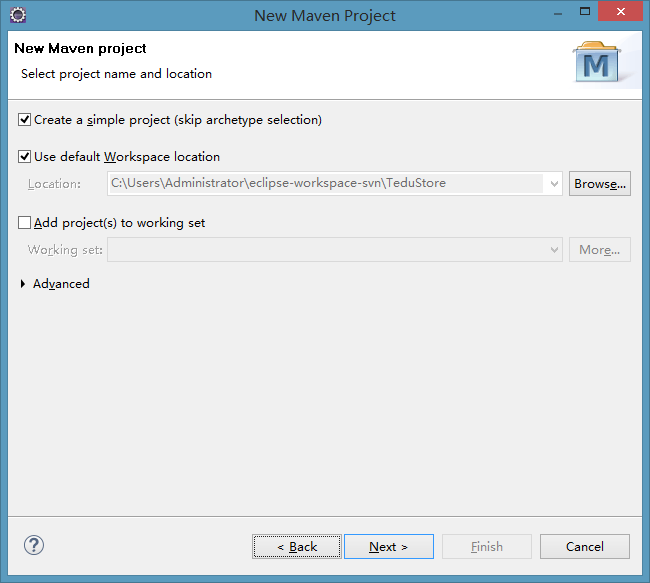
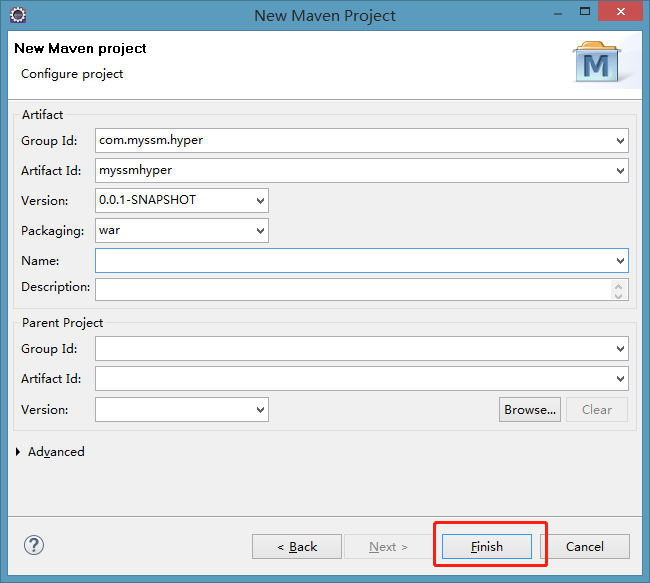
Maven项目创建
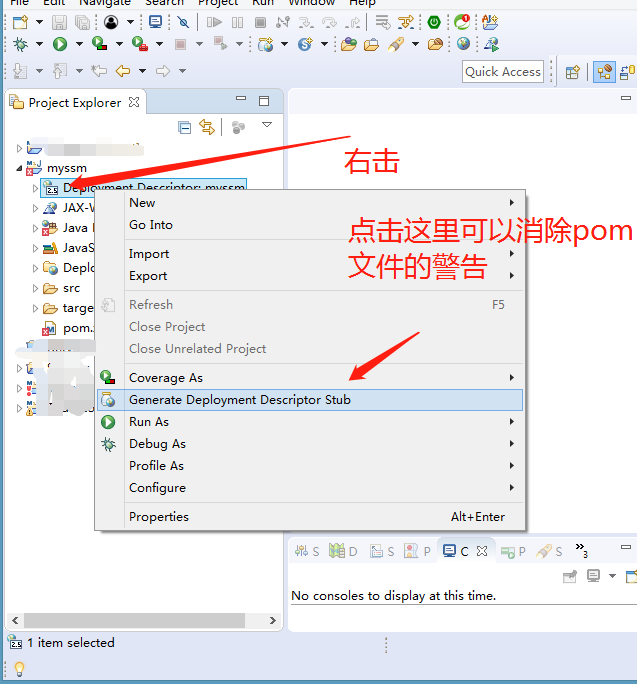
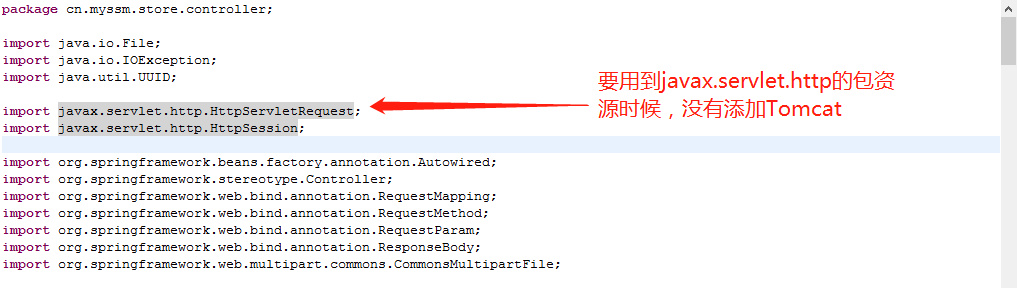
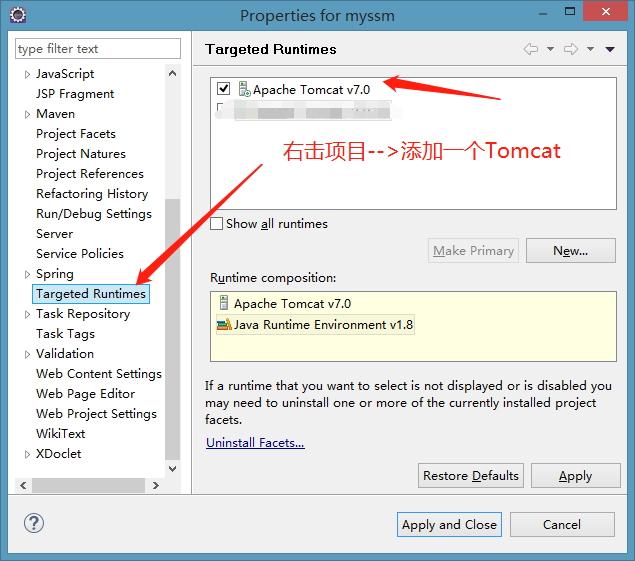
项目创建之后,要到javax.servlet下的包资源会报错解决方法
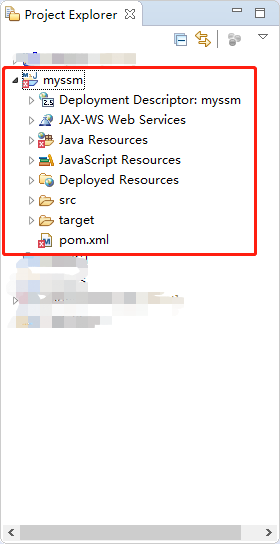
搭建SSM
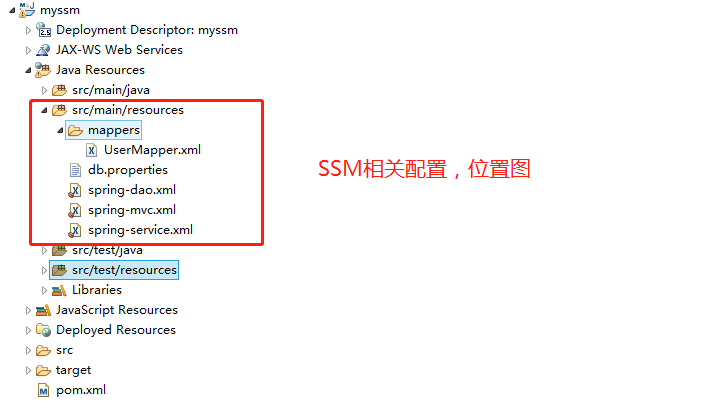
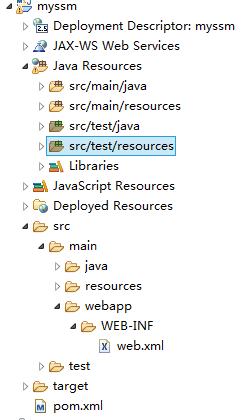
配置web.xml
配置DispatcherServlet,是SpringMVC的核心组件,用于接收所有请求,然后分发到各控制器,在配置时,必须确定初始化时加载的Spring配置文件是哪些!配置CharacterEncodingFilter,即字符编码过滤器,用于设置接收请求参数时的编码、响应的编码,必须确定所使用的编码。
1
2
3
4
5
6
7
8
9
10
11
12
13
14
15
16
17
18
19
20
21
22
23
24
25
26
27
28
29
30
31
32
33
34
35
36
37
38
39
40
41
42
43
44
45
46
47
48
<?xml version="1.0" encoding="UTF-8"?>
<web-app xmlns:xsi="http://www.w3.org/2001/XMLSchema-instance"
	xmlns="http://java.sun.com/xml/ns/javaee"
	xsi:schemaLocation="http://java.sun.com/xml/ns/javaee http://java.sun.com/xml/ns/javaee/web-app_2_5.xsd"
	version="2.5">
	<display-name>myssm</display-name>
	<welcome-file-list>
		<welcome-file>index.html</welcome-file>
		<welcome-file>index.htm</welcome-file>
		<welcome-file>index.jsp</welcome-file>
		<welcome-file>default.html</welcome-file>
		<welcome-file>default.htm</welcome-file>
		<welcome-file>default.jsp</welcome-file>
	</welcome-file-list>
	<!-- 配置是哪个Servlet -->
	<servlet>
		<servlet-name>SpringMVC</servlet-name>
		<servlet-class>org.springframework.web.servlet.DispatcherServlet</servlet-class>
		<!-- 当Servlet被初始化时加载Spring配置文件 -->
		<init-param>
			<param-name>contextConfigLocation</param-name>
			<param-value>classpath:spring-*.xml</param-value>
		</init-param>
		<!-- 当Tomcat启动时就初始化当前Servlet -->
		<load-on-startup>1</load-on-startup>
	</servlet>

	<!-- 配置Servlet对应的请求路径 -->
	<servlet-mapping>
		<servlet-name>SpringMVC</servlet-name>
		<url-pattern>*.do</url-pattern>
	</servlet-mapping>

	<!-- 配置字符编码过滤器 -->
	<filter>
		<filter-name>CharacterEncodingFilter</filter-name>
		<filter-class>org.springframework.web.filter.CharacterEncodingFilter</filter-class>
		<init-param>
			<param-name>encoding</param-name>
			<param-value>utf-8</param-value>
		</init-param>
	</filter>

	<filter-mapping>
		<filter-name>CharacterEncodingFilter</filter-name>
		<url-pattern>/*</url-pattern>
	</filter-mapping>
</web-app>
配置spring-mvc.xml
应该配置组件扫描,扫描目标是控制器类所在的包,虽然该功能可以配置为根级包,但是,不推荐这样做!关于视图解析器,使用的InternalResourceViewResolver,需要配置前缀和后缀,本次应该把前缀配置为/,而不是/WEB-INF/,主要是考虑到有HTML、CSS、JS文件,这些文件如果存放在/WEB-INF/下是无法被用户访问的!关于拦截器,本项目也需要使用登录拦截器,所以,把此前项目中的拦截器类复制到当前项目,并调整配置,主要是拦截器类所在的包!关于注解驱动,是固定的配置,每个项目中都添加即可。
1
2
3
4
5
6
7
8
9
10
11
12
13
14
15
16
17
18
19
20
21
22
23
24
25
26
27
28
29
30
31
32
33
34
35
36
37
38
39
40
41
42
43
44
45
46
47
48
49
50
51
52
53
54
55
<?xml version="1.0" encoding="UTF-8"?>
<beans xmlns="http://www.springframework.org/schema/beans"
	xmlns:xsi="http://www.w3.org/2001/XMLSchema-instance"
	xmlns:context="http://www.springframework.org/schema/context"
	xmlns:jdbc="http://www.springframework.org/schema/jdbc"
	xmlns:jee="http://www.springframework.org/schema/jee"
	xmlns:tx="http://www.springframework.org/schema/tx"
	xmlns:aop="http://www.springframework.org/schema/aop"
	xmlns:mvc="http://www.springframework.org/schema/mvc"
	xmlns:util="http://www.springframework.org/schema/util"
	xmlns:jpa="http://www.springframework.org/schema/data/jpa"
	xsi:schemaLocation="
		http://www.springframework.org/schema/beans http://www.springframework.org/schema/beans/spring-beans-3.2.xsd
		http://www.springframework.org/schema/context http://www.springframework.org/schema/context/spring-context-3.2.xsd
		http://www.springframework.org/schema/jdbc http://www.springframework.org/schema/jdbc/spring-jdbc-3.2.xsd
		http://www.springframework.org/schema/jee http://www.springframework.org/schema/jee/spring-jee-3.2.xsd
		http://www.springframework.org/schema/tx http://www.springframework.org/schema/tx/spring-tx-3.2.xsd
		http://www.springframework.org/schema/data/jpa http://www.springframework.org/schema/data/jpa/spring-jpa-1.3.xsd
		http://www.springframework.org/schema/aop http://www.springframework.org/schema/aop/spring-aop-3.2.xsd
		http://www.springframework.org/schema/mvc http://www.springframework.org/schema/mvc/spring-mvc-3.2.xsd
		http://www.springframework.org/schema/util http://www.springframework.org/schema/util/spring-util-3.2.xsd">

	<!-- 开启组件扫描 -->
	<context:component-scan
		base-package="cn.myssm.store.controller" />

	<!-- 视图解析器:根据视图名称得到视图资源 -->
	<bean
		class="org.springframework.web.servlet.view.InternalResourceViewResolver">
		<!-- 配置前缀 -->
		<property name="prefix" value="/WEB-INF/" />
		<!-- 配置后缀 -->
		<property name="suffix" value=".jsp" />
	</bean>

	<!-- 配置拦截器链 -->
	<mvc:interceptors>
		<!-- 配置第1个拦截器 -->
		<mvc:interceptor>
			<!-- 1. 拦截的路径 -->
			<mvc:mapping path="/user/**" />
			<mvc:mapping path="/main/index.do" />
			<!-- 2. 例外的路径,不拦截的路径,即白名单 -->
			<mvc:exclude-mapping path="/user/reg.do" />
			<mvc:exclude-mapping path="/user/handle_reg.do" />
			<mvc:exclude-mapping path="/user/login.do" />
			<mvc:exclude-mapping path="/user/handle_login.do" />
			<!-- 3. 指定拦截器类 -->
			<bean class="cn.myssm.store.interceptor.LoginInterceptor" />
		</mvc:interceptor>
	</mvc:interceptors>

	<!-- 注解驱动 -->
	<mvc:annotation-driven />
</beans>
配置spring-service.xml
1
2
3
4
5
6
7
8
9
10
11
12
13
14
15
16
17
18
19
20
21
22
23
24
25
<?xml version="1.0" encoding="UTF-8"?>
<beans xmlns="http://www.springframework.org/schema/beans"
	xmlns:xsi="http://www.w3.org/2001/XMLSchema-instance"
	xmlns:context="http://www.springframework.org/schema/context"
	xmlns:jdbc="http://www.springframework.org/schema/jdbc"
	xmlns:jee="http://www.springframework.org/schema/jee"
	xmlns:tx="http://www.springframework.org/schema/tx"
	xmlns:aop="http://www.springframework.org/schema/aop"
	xmlns:mvc="http://www.springframework.org/schema/mvc"
	xmlns:util="http://www.springframework.org/schema/util"
	xmlns:jpa="http://www.springframework.org/schema/data/jpa"
	xsi:schemaLocation="
		http://www.springframework.org/schema/beans http://www.springframework.org/schema/beans/spring-beans-3.2.xsd
		http://www.springframework.org/schema/context http://www.springframework.org/schema/context/spring-context-3.2.xsd
		http://www.springframework.org/schema/jdbc http://www.springframework.org/schema/jdbc/spring-jdbc-3.2.xsd
		http://www.springframework.org/schema/jee http://www.springframework.org/schema/jee/spring-jee-3.2.xsd
		http://www.springframework.org/schema/tx http://www.springframework.org/schema/tx/spring-tx-3.2.xsd
		http://www.springframework.org/schema/data/jpa http://www.springframework.org/schema/data/jpa/spring-jpa-1.3.xsd
		http://www.springframework.org/schema/aop http://www.springframework.org/schema/aop/spring-aop-3.2.xsd
		http://www.springframework.org/schema/mvc http://www.springframework.org/schema/mvc/spring-mvc-3.2.xsd
		http://www.springframework.org/schema/util http://www.springframework.org/schema/util/spring-util-3.2.xsd">
	<!-- 开启组件扫描 -->
	<context:component-scan
		base-package="cn.myssm.store.service.impl" />
</beans>
配置db.properties
重点检查url中的数据库名称、password的值!
配置spring-dao.xml
关于加载db.properties,通常是固定做法,即使更换项目也无须修改!关于BasicDataSource,也是固定做法,无须修改! 关于MapperScannerConfigurer,需要检查持久层接口所在的包!关于SqlSessionFactoryBean,需要检查持久层映射的XML文件所在的文件夹!
1
2
3
4
5
6
7
8
9
10
11
12
13
14
15
16
17
18
19
20
21
22
23
24
25
26
27
28
29
30
31
32
33
34
35
36
37
38
39
40
41
42
43
44
45
46
47
48
49
50
51
52
53
54
55
56
57
58
59
60
61
62
<?xml version="1.0" encoding="UTF-8"?>
<beans xmlns="http://www.springframework.org/schema/beans"
	xmlns:xsi="http://www.w3.org/2001/XMLSchema-instance"
	xmlns:context="http://www.springframework.org/schema/context"
	xmlns:jdbc="http://www.springframework.org/schema/jdbc"
	xmlns:jee="http://www.springframework.org/schema/jee"
	xmlns:tx="http://www.springframework.org/schema/tx"
	xmlns:aop="http://www.springframework.org/schema/aop"
	xmlns:mvc="http://www.springframework.org/schema/mvc"
	xmlns:util="http://www.springframework.org/schema/util"
	xmlns:jpa="http://www.springframework.org/schema/data/jpa"
	xsi:schemaLocation="
		http://www.springframework.org/schema/beans http://www.springframework.org/schema/beans/spring-beans-3.2.xsd
		http://www.springframework.org/schema/context http://www.springframework.org/schema/context/spring-context-3.2.xsd
		http://www.springframework.org/schema/jdbc http://www.springframework.org/schema/jdbc/spring-jdbc-3.2.xsd
		http://www.springframework.org/schema/jee http://www.springframework.org/schema/jee/spring-jee-3.2.xsd
		http://www.springframework.org/schema/tx http://www.springframework.org/schema/tx/spring-tx-3.2.xsd
		http://www.springframework.org/schema/data/jpa http://www.springframework.org/schema/data/jpa/spring-jpa-1.3.xsd
		http://www.springframework.org/schema/aop http://www.springframework.org/schema/aop/spring-aop-3.2.xsd
		http://www.springframework.org/schema/mvc http://www.springframework.org/schema/mvc/spring-mvc-3.2.xsd
		http://www.springframework.org/schema/util http://www.springframework.org/schema/util/spring-util-3.2.xsd">

	<!-- 读取db.properties -->
	<util:properties id="dbConfig"
		location="classpath:db.properties" />

	<!-- 配置数据源:BasicDataSource -->
	<bean id="ds"
		class="org.apache.commons.dbcp.BasicDataSource">
		<!-- 以下配置中 -->
		<!-- name的值是BasicDataSource中的属性名(方法名) -->
		<!-- value的值是引用以上读取的配置文件 -->
		<property name="url"
			value="#{dbConfig.url}" />
		<property name="driverClassName"
			value="#{dbConfig.driver}" />
		<property name="username"
			value="#{dbConfig.username}" />
		<property name="password"
			value="#{dbConfig.password}" />
		<property name="initialSize"
			value="#{dbConfig.initialSize}" />
		<property name="maxActive"
			value="#{dbConfig.maxActive}" />
	</bean>

	<!-- 配置MapperScannerConfigurer -->
	<bean class="org.mybatis.spring.mapper.MapperScannerConfigurer">
		<!-- 配置接口文件所在的包 -->
		<property name="basePackage"
			value="cn.myssm.store.mapper" />
	</bean>

	<!-- 配置SqlSessionFactoryBean -->
	<bean class="org.mybatis.spring.SqlSessionFactoryBean">
		<!-- 配置使用哪个数据源,ref属性的值是前序配置的数据源的bean id -->
		<property name="dataSource"
			ref="ds" />
		<!-- 配置XML映射文件的位置 -->
		<property name="mapperLocations"
			value="classpath:mappers/*.xml" />
	</bean>beans>
配置mappers/UserMapper.xml
这个配置文件主要是和接口对应起来,UserMapper.xml类似的xml文件主要是写SQL语句 关于一些Xml语句的增删改查写法请查阅先关资料
1
2
3
4
5
6
7
8
9
10
11
12
13
14
15
16
17
18
19
20
21
22
23
24
25
26
27
28
29
30
31
32
33
34
35
36
37
38
39
40
41
<?xml version="1.0" encoding="UTF-8" ?>
<!DOCTYPE mapper PUBLIC "-//ibatis.apache.org//DTD Mapper 3.0//EN"
	"http://ibatis.apache.org/dtd/ibatis-3-mapper.dtd">
<mapper namespace="cn.myssm.store.mapper.UserMapper">
	<!-- 插入用户数据 -->
	<!-- Integer insert(User user) -->
	<insert id="insert"
		parameterType="cn.myssm.store.entity.User"
		useGeneratedKeys="true"
		keyProperty="id">
		INSERT INTO t_user (
			username,
			password,
			email,
			phone,
			gender,
			avatar,
			salt,
			status,
			is_delete,
			created_user,
			created_time,
			modified_user,
			modified_time
		) VALUES (
			#{username},
			#{password},
			#{email},
			#{phone},
			#{gender},
			#{avatar},
			#{salt},
			#{status},
			#{isDelete},
			#{createdUser},
			#{createdTime},
			#{modifiedUser},
			#{modifiedTime}
		)
	</insert>
</mapper>
pom.xml
pom文件管理jar依赖
<project xmlns="http://maven.apache.org/POM/4.0.0" xmlns:xsi="http://www.w3.org/2001/XMLSchema-instance" xsi:schemaLocation="http://maven.apache.org/POM/4.0.0 http://maven.apache.org/xsd/maven-4.0.0.xsd">
  <modelVersion>4.0.0</modelVersion>
  <groupId>com.myssm.hyper</groupId>
  <artifactId>myssm</artifactId>
  <version>0.0.1-SNAPSHOT</version>
  <packaging>war</packaging>
  <dependencies>

		<!-- SpringMVC -->
		<dependency>
			<groupId>org.springframework</groupId>
			<artifactId>spring-webmvc</artifactId>
			<version>4.3.9.RELEASE</version>
		</dependency>

		<!-- Spring-JDBC -->
		<dependency>
			<groupId>org.springframework</groupId>
			<artifactId>spring-jdbc</artifactId>
			<version>4.3.9.RELEASE</version>
		</dependency>

		<!-- JUnit:单元测试 -->
		<dependency>
			<groupId>junit</groupId>
			<artifactId>junit</artifactId>
			<version>4.12</version>
		</dependency>

		<!-- MyBatis -->
		<dependency>
			<groupId>org.mybatis</groupId>
			<artifactId>mybatis</artifactId>
			<version>3.4.6</version>
		</dependency>

		<!-- MyBatis整合Spring -->
		<dependency>
			<groupId>org.mybatis</groupId>
			<artifactId>mybatis-spring</artifactId>
			<version>1.3.2</version>
		</dependency>

		<!-- MySQL -->
		<dependency>
			<groupId>mysql</groupId>
			<artifactId>mysql-connector-java</artifactId>
			<version>5.1.6</version>
		</dependency>

		<!-- DBCP -->
		<dependency>
			<groupId>commons-dbcp</groupId>
			<artifactId>commons-dbcp</artifactId>
			<version>1.4</version>
		</dependency>

		<!-- Jackson:解决ResponseBody的乱码问题,且自动装响应结果设置为json -->
		<dependency>
			<groupId>com.fasterxml.jackson.core</groupId>
			<artifactId>jackson-databind</artifactId>
			<version>2.9.7</version>
		</dependency>

		<!-- 文件上传 -->
		<dependency>
			<groupId>commons-fileupload</groupId>
			<artifactId>commons-fileupload</artifactId>
			<version>1.3.3</version>
		</dependency>

	</dependencies>

</project>
包结构

Redis
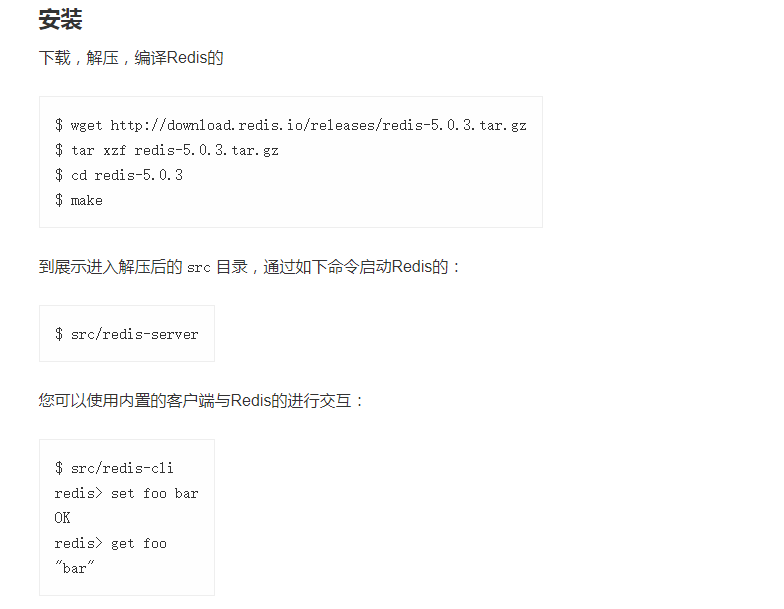
操作系统安装Redis
- 电脑主系统是Windows因此为了方便,在Windows系统安装SecureCRT来链接Linux系统。
- 下载redis压缩包:http://www.redis.cn/download.html
- 安装redis需要gcc环境,因此Linux系统中需要安装gcc环境:yum install gcc-c++
1
2
3
4
$ wget http://download.redis.io/releases/redis-5.0.3.tar.gz
$ tar xzf redis-5.0.3.tar.gz
$ cd redis-5.0.3
$ make
1
$ src/redis-server
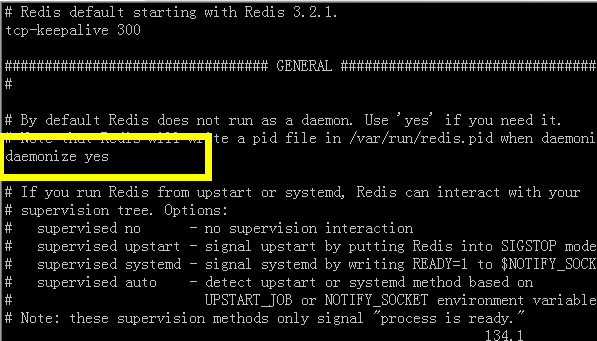
修改后台启动Redis
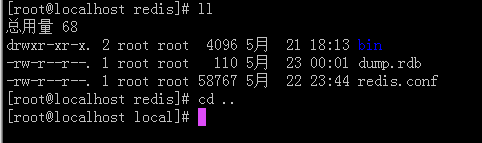 修改redis.conf文件 daemonize yes(大概在100+行)
pom.xml文件中添加jar包
1
2
3
4
5
  <dependency>
    <groupId>redis.clients</groupId>
     <artifactId>jedis</artifactId>
     <version>2.9.0</version>
   </dependency>
redis.properties
1
2
3
4
5
6
7
    redis.hostname=47.94.3.11
    redis.port=6379
    redis.database=0
    redis.pool.maxActive=600
    redis.pool.maxIdle=300
    redis.pool.maxWait=3000
    redis.pool.testOnBorrow=true
spring-redis.xml
1
2
3
4
5
6
7
8
9
10
11
12
13
14
15
16
17
18
19
20
21
22
23
24
25
26
27
28
29
30
31
32
33
34
35
36
37
38
39
40
41
42
43
44
45
46
<beans xmlns="http://www.springframework.org/schema/beans"
	xmlns:xsi="http://www.w3.org/2001/XMLSchema-instance" xmlns:context="http://www.springframework.org/schema/context"
	xsi:schemaLocation="http://www.springframework.org/schema/beans
        http://www.springframework.org/schema/beans/spring-beans-3.2.xsd
        http://www.springframework.org/schema/context
        http://www.springframework.org/schema/context/spring-context-3.2.xsd">
	<bean id="jedisPoolConfig" class="redis.clients.jedis.JedisPoolConfig">
		<property name="maxTotal" value="${redis.pool.maxActive}" />
		<property name="maxIdle" value="${redis.pool.maxIdle}" />
		<property name="maxWaitMillis" value="${redis.pool.maxWait}" />
		<property name="testOnBorrow" value="${redis.pool.testOnBorrow}" />
	</bean>

	<bean id="jedisWritePool" class="com.imooc.myo2o.cache.JedisPoolWriper"
		depends-on="jedisPoolConfig">
		<constructor-arg index="0" ref="jedisPoolConfig" />
		<constructor-arg index="1" value="${redis.hostname}" />
		<constructor-arg index="2" value="${redis.port}" type="int" />
	</bean>
	<bean id="jedisKeys" class="com.imooc.myo2o.cache.JedisUtil$Keys"
		scope="singleton">
		<constructor-arg ref="jedisUtil"></constructor-arg>
	</bean>
	<bean id="jedisStrings" class="com.imooc.myo2o.cache.JedisUtil$Strings"
		scope="singleton">
		<constructor-arg ref="jedisUtil"></constructor-arg>
	</bean>
	<bean id="jedisLists" class="com.imooc.myo2o.cache.JedisUtil$Lists"
		scope="singleton">
		<constructor-arg ref="jedisUtil"></constructor-arg>
	</bean>
	<bean id="jedisSets" class="com.imooc.myo2o.cache.JedisUtil$Sets"
		scope="singleton">
		<constructor-arg ref="jedisUtil"></constructor-arg>
	</bean>
	<bean id="jedisHash" class="com.imooc.myo2o.cache.JedisUtil$Hash"
		scope="singleton">
		<constructor-arg ref="jedisUtil"></constructor-arg>
	</bean>
	<bean id="jedisUtil" class="com.imooc.myo2o.cache.JedisUtil"
		scope="singleton">
		<property name="jedisPool">
			<ref bean="jedisWritePool" />
		</property>
	</bean>
</beans>
web.xml中配置 spring-redis.xml、redis.properties即可
This post is licensed under
CC BY 4.0
by the author.